Scenic Underwater Photography Spots in Soma Bay & Safaga
Photographers flock to the Red Sea’s Soma Bay and Safaga for a mix of lush coral gardens, dramatic reef walls, and eye catching critters. From tranquil slopes to thrilling swim throughs, these sites offer varied subjects and reliable visibility. Accessibility is often boat based with easy shore access at many spots, making it ideal for both beginners and seasoned shooters.
-
Tobia Arbaa
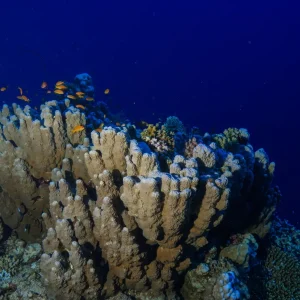
- Visuals: A panorama of pinnacles rising from sandy bottoms, vibrant soft corals, and playful reef fish.
- What to shoot: Wide angle shots of the garden structures, macro frames of tiny nudibranchs and shrimps between coral fingers. Ray silhouettes over the sand add depth.
- Accessibility: Easy entry from a drift or shore-based boat; currents are manageable with a relaxed swim over the garden.
-
Tobia Kebir
- Visuals: Tunnels, canyons, and dramatic coral formations that invite light beams to slice through.
- What to shoot: Swim throughs for dramatic silhouettes; moray eels, lionfish, and parrotfish weaving through the caverns.
- Accessibility: Popular dive site with clear, relatively shallow sections perfect for wide angle captures.
-
Abu Soma Garden
- Visuals: Gentle slopes carpeted with lush coral gardens and a rainbow of reef inhabitants.
- What to shoot: Colorful coral colonies, butterflyfish, angelfish flitting among the anemones and sponges.
- Accessibility: Very approachable for relaxed photography; ideal for dusk or early morning shoots when light is soft.
-
Sha’ab Saiman
- Visuals: Adventurous site with swim throughs and open water corridors that spark dynamic compositions.
- What to shoot: Eagle rays cruising overhead, cruising barracudas, and fast moving schooling fish through the arches.
- Accessibility: A bit more current at times; plan a calm day and use a robust buoyancy setup for precise framing.
-
Ras Abu Soma (Abu Soma area)
- Visuals: Walls and garden edges where reef structures create dramatic lines and textures.
- What to shoot: Pixel sharp wall portraits, macro of sponges and crinoids, and big fish darting along the reef edge.
- Accessibility: Classic Red Sea cliff scenery; best with a guided drift to keep you in the photo zone.
-
Salem Express wreck
- Visuals: Historic wreck silhouetted against blue water, life encrusting over steel and coral colonization.
- What to shoot: Wide shots of the hull, macro details of encrusting organisms, and resident reef fish schooling around the wreck.
- Accessibility: Deeper site, requires appropriate training and dive planning for passable currents and penetration rules where allowed.
-
Al Kafhain wreck
- Visuals: Car ferry wreck with a platform for dramatic compositions and resident schools of fish.
- What to shoot: Broad angles of the wreck’s silhouette, macro textures on corals and bolts, and nocturnal light plays if permitted.
- Accessibility: Advanced site; coordinate with a reputable operator for current, depths, and safety.
-
Abu Soma Garden and Sha’ab Saiman at dusk
- Visuals: Golden water as the sun dips, silhouettes of reef structures, and glowing corals under ambient light.
- What to shoot: Long exposures of the reef edge, beam shots through arches, and sleepy reef life waking up.
- Accessibility: Ideal for photographers who want dramatic lighting; plan around sunset timing and safety margins.
Pro tips for Diving Safaga & Soma Bay photographers:
- Gear choice: Wide angle for walls and gardens; macro rig for small critters; strobes or video lights to bring colors back at depth.
- Timing: Early morning and late afternoon light creates the most color and contrast on coral surfaces.
- Buoyancy: Ultra stable buoyancy keeps corals intact and prevents backscatter in photos.
- Respect: Follow local guidelines, avoid touching reef life, and practice responsible photo ethics.
These prime photography sites showcase the variety that makes Safaga and Soma Bay a magnet for underwater storytellers. Whether you chase vibrant gardens or dramatic walls, the Red Sea delivers color, clarity, and cinematic depth.
Photography site quick reference
| Site |
Highlight |
Best Depth |
Notes |
| Tobia Arbaa |
Pinnacles and gardens |
6–18 m |
Easy entry, great for wide angle |
| Tobia Kebir |
Tunnels and canyons |
8–22 m |
Swim throughs offer dramatic frames |
| Abu Soma Garden |
Colorful coral slopes |
6–20 m |
Relaxed photography conditions |
| Sha’ab Saiman |
Swim throughs and rays |
6–18 m |
Currents vary, plan accordingly |
| Salem Express wreck |
Historic wreck life |
20–30 m |
Advanced site, depth risk |
| Al Kafhain wreck |
Wreck silhouettes |
25–30 m |
Penetration rules apply |
Tobia Kebir
Tobia Kebir features tunnels, canyons, and vibrant coral formations that create dramatic underwater landscapes. Light pours through openings, highlighting textures and color along every contour.
What to shoot:
- Swim-throughs and canyon walls frame the blue like underwater architectural photography.
- Moray eels peek from crevices, lionfish hover among sponges, and parrotfish weave through the caverns.
- Beams of sunlight pierce the tunnels to reveal vibrant corals and suspended sand for depth.
Depth and conditions:
- Shallow to mid-depth sections, suitable for a range of rigs and lenses.
- Typically clear visibility with manageable currents, good for precise framing.
Photography tips:
- Plan your approach to align the tunnel entrances with your subject for dramatic silhouettes.
- Use a wide angle to capture the scale of the canyons and the relation between rock and reef life.
- Stay close to the walls to reduce backscatter and keep colors crisp on the corals.
Accessible and rewarding, Tobia Kebir delivers architectural intrigue beneath the surface, where light, shadow, and marine life converge for striking compositions.
Abu Soma Garden
Abu Soma Garden offers a gentle slope carpeted with lush coral gardens. It provides relaxed dive photography with a calm backdrop and ample life to frame your shots.
What to shoot:
- Colorful coral colonies and the soft movement of the garden as a natural backdrop.
- Butterflyfish and angelfish weaving through the corals in tranquil, unobtrusive frames.
- Macro opportunities on tiny critters tucked into the reef furniture.
Depth and conditions:
- Shallow to mid-depth ranges, accessible for a variety of setups.
- Typically gentle currents and clear visibility, ideal for composed shoots.
Photography tips:
- Move slowly to protect the reef and reduce particulates that cause backscatter.
- Use a wide angle for expansive reef scenes and a macro lens for close subject detail.
- Work on even lighting by positioning yourself to minimize harsh shadows on the corals.
Abu Soma Garden rewards patience with serene reef scenes and soft, natural colors that translate beautifully in photos.
Sha’ab Saiman
Sha’ab Saiman is an adventurous site with swim-throughs and open-water corridors that add energy to your Red Sea dives. Expect strong currents, lively predators, and a sense of motion that pushes you to capture fast-moving subjects and expansive reef-scapes.
What to shoot:
- Wide-angle compositions of the swim-throughs and archways to convey depth and movement.
- Eagle rays gliding overhead and barracudas along the edges for dramatic foreground action.
- Schooling fish weaving through the reef structure to create scale and energy.
Depth and conditions:
- Typically shallow to mid depth, offering both wide and macro opportunities.
- Currents vary; plan for a calm day and be ready for a more exhilarating drift.
Photography tips:
- Use a wide-angle lens to maximize the impact of the swim-throughs and schools of fish.
- Anticipate animal movement and choose a slightly higher shutter speed to freeze action while keeping context.
- Stay close to reef structures to preserve color and reduce backscatter in fast passages.
Sha’ab Saiman offers a compelling shooting environment with its swim-throughs and roaming fish, delivering dynamic frames and expansive underwater scenery for photographers seeking breadth in their portfolio.
Salem Express wreck
Salem Express wreck is a historically significant wreck near Safaga to photograph, offering shadow lines, encrusted hulls, and abundant marine life that make for compelling wreck photography across macro and wide-angle angles.
What to shoot:
- Wide shots of the hull silhouette and surrounding blue water to convey scale and history.
- Macro details of encrusting corals, sponges, and rivets that tell the wreck’s age.
- Schooling reef fish and resident nudibranchs that inhabit the wreck’s nooks and crevices.
Depth and conditions:
- Typically mid depth, requiring careful planning for ascent and descent.
- Depth and currents vary; check current conditions and follow a guided plan.
Photography tips:
- Stabilize with steady buoyancy to frame wide angles without disturbing the structure.
- Use side lighting or strobe angles to highlight textures on the hull and encrustations.
- Move slowly along the hull to capture layers of life and avoid backscatter in clear water.
When photographed with respect for depth and history, the Salem Express wreck yields compelling narratives of resilience, time, and marine life thriving on once human-made structures.
Al Kafhain wreck
Al Kafhain wreck is a car ferry wreck near Safaga that provides a dramatic silhouette against clear blue water. The structure offers multiple angles and a resident community of reef fish, making it a rewarding subject for textured wreck photography and creative lighting through the wreck’s framework.
What to shoot:
- Wide angles to capture the ferry’s profile and the surrounding water column.
- Macro details of bolts, corroded surfaces, and encrusting organisms that tell the wreck’s story.
- Light beams threading through openings to reveal interior textures and resident life.
Depth and conditions:
- Moderate depths that suit a range of gear setups.
- Currents vary; plan for a day with gentle drift and stable buoyancy control.
Photography tips:
- Position yourself to frame the hull against blue water and use the wreck’s angles to lead the eye.
- Use side or back lighting to accentuate textures and reduce flat appearances on metal surfaces.
- Move slowly along the structure to document layers of life without disturbing the habitat.
Al Kafhain wreck rewards patient photographers with rich textures, silhouettes, and the chance to capture the intersection of human engineering and marine resilience.
Marine Life You’ll See in Soma Bay & Safaga
Soma Bay and Safaga host a rich tapestry of Red Sea life. From peaceful gardens to bustling pelagic lanes, you’ll encounter a spectrum of subjects perfect for engaging photography and vivid storytelling.
-
Sea turtles are frequent visitors to coral slopes and gentle ledges.
- Watch for slow, deliberate patterns as they graze on seagrass and sponges.
- Composition tip: frame turtles against a colorful foreground coral to emphasize scale.
-
Reef sharks patrol reef edges and drop-offs with confident, steady passes.
- Spotting cue: look for late afternoon schooling along the reef wall.
- Composition tip: use a wider scene to show the shark in relation to the structure for context.
-
Hammerheads and other pelagics can appear near wrecks and deep ledges.
- Behavior cue: occasional schooling or solo patrols following current lines.
- Composition tip: shoot from a slightly lower angle to exaggerate the subject’s silhouette against blue water.
-
Moray eels hide in crevices, often peeking out to survey passing divers.
- Spotting cue: a dark slit of a mouth or a slow coil of the body from a rock crack.
- Composition tip: shoot macro or close-up with a bright background to highlight texture.
-
Parrotfish, angelfish, and butterflyfish create color and motion across gardens.
- Behavior cue: feeding, grazing, and darting between corals.
- Composition tip: use negative space to convey the gentle pace of reef life and avoid overfilling the frame.
-
Clownfish and anemones offer classic close-up opportunities.
- Spotting cue: tiny corals hosting anemones with resident fish tucked inside.
- Composition tip: get low, frame through surrounding anemone tentacles for a pop of color.
-
Crustaceans and macro life such as shrimp, shrimp gobies, and shrimpgoby pairs.
- Spotting cue: look for subtle movement in the rubble or coral fingers as tiny subjects explore.
- Composition tip: macro lenses shine here; backlight to reveal textures and translucence.
Behavior spotting tips
- Observe current direction and water clarity to anticipate where fish will travel.
- Move slowly and deliberately to avoid frightening shy subjects and to keep fish in frame.
- Look for feeding times and dusk or dawn light, which often render more active reef behavior.
Composition notes
- Use leading lines of coral edges or reef walls to guide the viewer to the subject.
- Incorporate color contrast such as a blue backdrop with warm toned fish to enhance depth.
- Balance wide scenes with macro details to tell a complete underwater story.
Whether you’re chasing graceful turtles or the high energy of pelagic visitors, Soma Bay and Safaga reward patient shooters with vibrant life, clear water, and opportunities to craft compelling underwater portraits and scenes.
Crocodilefish
The crocodilefish hides along coral slopes and reef edges, its mottled sandy tones blending with the seabed.
What to shoot:
- Macro portraits that highlight rough, textured skin and lizard-like features.
- Closeups of camouflage patterns, speckled fins, and eye details.
- Textures of sandy ambush points and crevices where they lie in wait.
Depth and conditions:
- Typically shallow to mid depths on reef flats and slopes.
- Steady buoyancy helps you approach without startling it; plan for low current days to keep the subject in frame.
Photography tips:
- Light the macro subject from the side to emphasize texture and ridges.
- Back up and zoom with a macro lens to capture the full body profile without glare.
- Use a snoot or small aperture to isolate the crocodilefish against the sand.
Patience pays off with dramatic portraits as this species holds its ground in plain sight, revealing intricate textures that make for striking close ups.
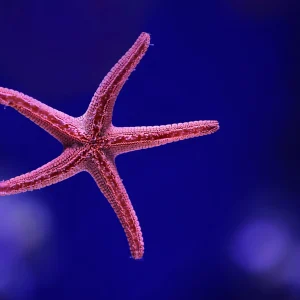
Blue-spotted Rays
Blue-spotted Rays are graceful inhabitants of sandy bottoms; ideal for wide-angle silhouettes and trailing ray photography with clean backdrops and sunlit water columns.
What to shoot:
- Wide-angle silhouettes of rays gliding over pale sand, with light beams filtering from above.
- Trailing rays in clean, uncluttered water to emphasize motion and form.
- Macro details of the ray’s eye, mouth, and wing texture when in shallow, clear setups.
Depth and conditions:
- Typically shallow to mid depths where sunlight penetrates and enhances color.
- Calm conditions with good visibility help isolate the subject from the background.
Photography tips:
- Position yourself slightly ahead of the ray to capture its natural arcing movement.
- Use a wide-angle lens to exaggerate the silhouette against a sunlit backdrop.
- Keep a comfortable distance to avoid disturbing the ray and to maintain clean water columns in frame.
Blue-spotted Rays reward patient photographers with clean lines, soft textures, and serene compositions that highlight the calm beauty of the Red Sea floor.
Trumpetfish
Trumpetfish are often seen patrolling reefs; great for kinetic compositions and motion blur shots that emphasize their elongated profile against colorful coral habitats.
What to shoot:
- Long, sweeping shots that follow the trumpetfish as it glides along the reef edge.
- Slow shutter speed techniques to create a sense of motion while keeping the fish as the focal point.
- Close encounters that reveal the slender body against intricate coral textures.
Depth and conditions:
- Typically shallow to mid depths suitable for a range of lenses.
- Calm to moderate currents help you maintain a clean background and smooth motion.
Photography tips:
- Track the fish smoothly with your buoyancy stable to avoid chasing or scaring it.
- Use a slower shutter to accentuate movement while keeping the trumpetfish sharp.
- Position yourself to place the fish against a contrasting blue or colorful coral backdrop for maximum impact.
Trumpetfish add a sense of movement and elegance to reef scenes, offering opportunities to craft elongated silhouettes that stand out in underwater portfolios.
Napoleon Fish
Napoleon Fish are among the Red Sea’s largest reef inhabitants, delivering a bold focal point for wide angle reef scenes. Their size and striking patterns pair beautifully with textured corals and nearby schooling fish.
What to shoot:
- Wide angle portraits with the Napoleon Fish as a central anchor against rugged coral textures.
- Interactions with schooling fish to show scale and movement in the reef frame.
- Macro details of the fish’s bold markings and fin structure for dramatic closeups.
Depth and conditions:
- Typically mid to outer reef zones where visibility is strong.
- Calm to moderate currents help maintain composition without rushing the subject.
Photography tips:
- Position the fish off-center to emphasize its size and create a sense of depth with the surrounding reef.
- Use a wide angle lens for expansive scenes; a telephoto can isolate the subject with background texture.
- Be mindful of buoyancy to avoid stirring fine sediments that obscure color and detail.
Napoleon Fish bring scale, drama, and a cinematic feel to reef photography in Soma Bay and Safaga.
Clownfish
Clownfish are classic micro-subjects for colorful, intimate portraits inside anemones, ideal for shallow, well-lit shots with clean backgrounds.
What to shoot:
- Macro portraits of the clownfish peeking from the anemone tentacles.
- Closeups of the fish with the bright, striped pattern framed by the soft tentacles.
- Interactions between clownfish and their host anemone to tell a simple, intimate story.
Depth and conditions:
- Shallow to mid depths, typically 5–12 m, where light remains strong.
- Calm to gentle currents with clear water help maintain clean backgrounds.
Photography tips:
- Get close and shoot with a wide aperture to blur the background while keeping the subject sharp.
- Use diffused lighting or strobes at low power to avoid washing out the anemone colors.
- Be careful not to touch the anemone or stingy tentacles; maintain buoyancy and respect wildlife.
Clownfish photography rewards patient shooters with vibrant color contrasts, delicate textures, and intimate portraits that pop against pristine blue water.
Humphead Wrasse
Ecologically impressive reef residents that offer dramatic scale in wide-angle frames and striking color and profile in greater depths.
They display a broad, commanding presence underwater, often visible from a distance and revealing bold shapes as you approach with a wide lens. In deeper sites, their hues and contours become a focal point against the reef’s backdrop.
Humphead Wrasse
The Humphead Wrasse is one of the Red Sea’s iconic large reef fishes. Its massive size, the distinctive nodules on the jaw, and the shimmering body color create drama in wide-angle scenes and bold portraits in deeper water.
What to shoot:
- Wide-angle scenes that place the wrasse against expansive reef walls or open blue to show scale.
- Closeups that highlight the wrasse’s head, eye, and pectoral fin patterns.
- Interactions with schooling fish or coral gardens to show habitat context.
Depth and conditions:
- Typically mid to outer reef depths where visibility is clear and light remains rich.
- Calm to moderate currents suit both wide and macro work without stressing the subject.
Photography tips:
- Frame the wrasse with ample negative space to emphasize its size and presence.
- Use a wide angle for environmental portraits; switch to a telephoto for intimate details from a respectful distance.
- Maintain buoyancy to prevent stirring sediment and to keep the fish in frame during longer passes.
When photographed with care for its habitat and behavior, the Humphead Wrasse delivers monumental, cinematic moments that elevate any underwater portfolio.
Hammerhead
Hammerhead are a rarer but thrilling sight for wide-angle photography in deep channels; plan for patience and clear visibility to capture these iconic predators.
What to shoot:
- Wide-angle landscapes that place hammerheads against open blue with dramatic depth.
- Silhouettes or backlit silhouettes when the sun filters through the water column for a cinematic look.
- Schooling formations and interactions with other reef life to convey scale and motion.
Depth and conditions:
- Typically mid to deep channels where visibility remains high and currents bring sharks into view.
- Be prepared for stronger currents; plan dives with experienced operators and a safe ascent plan.
Photography tips:
- Use a wide-angle lens to maximize space and the hammerhead’s size in the frame.
- Maintain a respectful distance to avoid altering their behavior; use a telephoto option for close portraits from afar.
- Shoot in bursts to capture multiple passes as they circle or swim by your line of sight.
Hammerhead encounters reward patient divers with dramatic, memorable frames that highlight the Red Sea’s pelagic inhabitants.
Barracuda
Barracuda are a common sight along Safaga and Soma Bay wrecks and reef edges. Their predatory silhouettes and schooling behavior create lively scenes that suit action-packed compositions.
What to shoot:
- Predatory silhouettes gliding along reef edges or wreck hulls.
- Schooling barracuda forming long, shimmering lines in open water.
- Interactions with bait fish or larger predators for dramatic predator dynamics.
Depth and conditions:
- Typically shallow to mid depths near wrecks or edges; visibility is often favorable for clear silhouettes.
- Barracuda move quickly; maintain steady buoyancy and anticipate lines of movement for framing.
Photography tips:
- Use fast shutter speeds to freeze motion or pan to convey speed and fluidity.
- Frame silhouettes against a bright blue backdrop or sunlit patches to enhance contrast.
- Position yourself to lead the subject with the frame; a telephoto lens helps capture tight, dramatic portraits from a safe distance.
Barracuda images add energy to reef and wreck photography, offering bold shapes and dynamic lines that elevate underwater storytelling.
Tuna
Tuna bring quick, streamlined silhouettes to reef scenes, especially where open water meets colored structures. Think bold outlines slicing past reef edges or cruising along expansive flats near wrecks.
What to shoot:
- Wide angle silhouettes of tuna gliding past reef formations for dramatic contrast.
- Profile shots showing speed lines as they skim over open water near wreck hulls or long sandy flats.
- Juxtaposed frames that place the fish against textured coral or metallic wreck surfaces to highlight scale.
Depth and conditions:
- Typically open water zones; prefer mid to outer reef depths where visibility is clear.
- Calm to moderate currents help you maintain position and frame without chasing the fish.
Photography tips:
- Use a fast shutter to freeze the fish in motion while keeping the background sharp.
- Position yourself to create a strong contrast between the tuna and a dark reef backdrop or bright blue horizon.
- Work with a wide angle for environmental context or a telephoto to isolate the silhouette against open water.
Capturing tuna in open water zones near wrecks or expansive reef flats yields bold, kinetic images that emphasize speed, form, and the drama of the Red Sea underwater world.
Mackerel
Mackerel patrol reefs and wrecks, offering fast-moving subjects for dynamic compositions and shimmering surface light glimpses.
What to shoot:
- Wide-angle scenes that capture school lines threading through reefs and circling wrecks.
- Silhouettes and side-lit shots that reveal the fish’s streamlined bodies in dramatic profiles.
- Beams of surface light catching the metallic sheen as they streak past in open water.
Depth and conditions:
- Typically shallow to mid depths where schools maneuver around structures.
- Good visibility helps preserve the motion and reveal reflected light on the fish.
Photography tips:
- Use fast shutter speeds to freeze rapid schooling movements; experiment with panning for motion blur.
- Follow the school with smooth buoyancy to maintain framing without chasing.
- Position yourself to exploit surface light for shimmering highlights on the fish scales.
Mackerel deliver kinetic energy to reef and wreck photography, producing bright, fast-moving frames that highlight the Red Sea’s dynamic underwater life.
Stonefish
Stonefish are well-camouflaged subjects that reward macro photographers with close-up patterns and the challenge of depicting their textured mantles safely.
What to shoot:
- Macro portraits that emphasize skin texture, color mottling, and wart-like ridges.
- Close-ups of the eyes, dorsal spines, and subtle color variations that reveal the mantle’s complexity.
- Patterns and micro-details tucked into coral rubble where the fish rests.
Depth and conditions:
- Typically shallow to mid depths; approach with extreme caution due to venomous spines.
- Move slowly and maintain a respectful distance to avoid startling the subject and to keep yourself safe.
Photography tips:
- Use a macro lens and a steady setup to capture fine textures without blur.
- Light from the side or slightly behind to reveal surface patterns and reduce glare.
- Keep your buoyancy neutral and stay off the reef to avoid disturbing the mantle or causing sediment lift.
Patience pays off with revealing the stonefish’s intricate camouflage and sculpted skin, turning a challenging subject into a striking macro image.
Mothfish
Mothfish are elusive reef dwellers that reward macro and mid-range photographers with subtle color and delicate shapes tucked into crevices and overhangs.
What to shoot:
- Macro portraits highlighting fine skin textures, gentle color hints, and elegant fin structures.
- Close ups of camouflage patterns as mothfish blend with sandy and rocky backgrounds.
- Shots of fish peeking from crevices to convey their secretive nature within the reef architecture.
Depth and conditions:
- Typically shallow to mid depths where ambient light reveals soft color nuances.
- Quiet waters and minimal surge help maintain framing inside small cavities and overhangs.
Photography tips:
- Close in with a macro lens and use side lighting to bring out subtle hues without washing out details.
- Stabilize your buoyancy to hold position while exploring narrow crevices.
- Move slowly to minimize disturbance and to increase chances of catching the mothfish in a natural pose.
Patience and careful composition turn the mothfish from a fleeting subject into a quiet, color whisper within Soma Bay and Safaga’s vibrant reef systems.
Notable Wrecks for Photography
Notable Wrecks for Photography
Wrecks around Soma Bay and Safaga offer dramatic silhouettes, rust textures, and resident life that transform into striking photographic subjects. These sites reward careful planning, buoyancy control, and respect for marine life. Below are the most reliable targets for creative wreck photography.
Salem Express wreck
The Salem Express lies near Safaga and presents a haunting backdrop of history entwined with vibrant reef life. Wide-angle hull silhouettes against blue water pair with macro detail on encrustations to tell a compelling story.
What to shoot:
- Wide shots of the hull and surrounding water to convey scale and tragedy.
- Macro textures on rivets, sponges, and encrusting organisms for tactile detail.
- Schooling reef fish and resident nudibranchs that inhabit the wreck’s nooks.
Depth and conditions:
- Mid depth; plan for careful ascent and descent with a guided plan.
- Currents vary; verify conditions with a local operator before penetration attempts where allowed.
Photography tips:
- Stabilize buoyancy to frame wide angles without disturbing the structure.
- Use side lighting to highlight textures and avoid flat appearances on metal surfaces.
- Move slowly along the hull to capture layered life and minimize backscatter.
Photographing the Salem Express with care reveals a narrative of time, resilience, and marine adaptation around a storied Red Sea wreck.
Al Kafhain wreck
The Al Kafhain car ferry wreck near Safaga provides a dramatic silhouette and multiple angles for textured wreck photography. Its framework invites creative lighting and resident reef fish to populate the scene.
What to shoot:
- Wide angles that capture the ferry’s profile against the blue water.
- Macro details of bolts, corroded surfaces, and encrusting life for texture.
- Light beams threading through openings to reveal interior textures and resident life.
Depth and conditions:
- Moderate depths suitable for a range of gear setups.
- Currents vary; plan for a day with gentle drift and stable buoyancy control.
Photography tips:
- Position yourself to frame the hull against blue water and use the wreck’s angles to lead the eye.
- Use side or back lighting to accentuate textures and reduce flat appearances on metal surfaces.
- Move slowly along the structure to document layers of life without disturbing the habitat.
Al Kafhain wrecks offer rich textures and dramatic silhouettes, ideal for storytelling through wreck photography in the Red Sea environment.
Wreck photography: considerations and quick reference
Maintain neutral buoyancy to protect the wreck and keep sediment from dulling your images. This helps preserve both the structure and the surrounding life.
Plan compositions that emphasize the hulls’ architecture, scale, and the creatures that inhabit the scene. Be mindful of depth and follow local guidelines for penetration and lingering near wrecks.
Wreck photography quick reference
| Wreck |
Visual Opportunities |
Best Depth |
Key Tips |
| Salem Express |
Hull silhouettes, encrusted textures |
~20–30 m |
Study light beams; approach with caution |
| Al Kafhain |
Profile shots, interior textures |
~25–30 m |
Mind penetration rules; use side lighting |
Dive Access & Facilities for Photography
Dive Access & Facilities for Photography
Efficient access to boats, sites, and gear support is crucial for productive underwater photography trips in Soma Bay and Safaga. This section outlines practical access points, facilities, and arrival options that keep your schedule streamlined and your kit protected.
Primary arrival gateways
Hurghada International Airport (HRG) serves as the main gateway for Safaga and Soma Bay. From the airport, you’ll typically transfer by road to your resort or dive center within 45 minutes to 1.5 hours, depending on traffic and destination.
Cairo to Red Sea corridor is another option. Travelers can overnight or take a daytime transfer, then connect domestically to Hurghada or head directly to a coastal resort, followed by a transfer to the dive site.
Dive centers and on-site facilities
Resort-based dive centers provide rinse tanks, camera rinse bins, and gear storage to simplify pre-dive and post-dive routines. This setup helps keep your gear organized between dives.
Boats are usually moored near resorts or dive centers, enabling quick towouts to inner reefs or longer day trips to outer sites and wrecks. Expect rinsing and drying areas to support equipment care between sessions.
Transport and mobility
Resort transfers are often included, reducing the need to carry gear long distances. Local taxis or hotel shuttles commonly reach nearby launch points or shore dives.
Look for boats with dedicated camera workplaces, such as rinse stations, charging stations, and secure camera mounts. Some centers offer transport within a 15 km radius.
Gear care and preparation
Most facilities provide fresh water rinses for housings and strobes. Carry a small dry bag for post-dive gear transport to keep items organized.
Check boat and center outlets and bring a universal adapter. A compact power strip can help charge multiple devices between dives.
Drying and storage
Use designated camera racks or shaded areas to dry lenses and housings. Keep sensitive items in padded soft cases when not in use.
Rinse stations and storage spaces help protect gear between sessions, supporting a smooth workflow on busy days.
Operational tips for photographers
- Coordinate dive and photography slots with your operator to align site time with optimal lighting.
- Request early starts for better visibility and fewer boats in the frame, especially on popular sites.
- Pre-board checklists: protect lenses from salt spray, confirm buoyancy and camera settings, and verify spare parts or back-up housings are available if needed.
Arrival day planning
Outline a two to three day photography plan that matches dive site access with lighting windows.
Pack a camera ready to go with two strobes, a wide angle and a macro lens, plus spare batteries and memory cards.
Confirm equipment hand carry policies for flights and boats to avoid delays at security checks.
With solid access points, reliable dive centers, and well organized transport, photographers can focus on capturing the vivid biodiversity of Soma Bay & Safaga without getting bogged down by logistics.
Mövenpick Resort Soma Bay
Mövenpick Resort Soma Bay hosts a 5-Star PADI diving center on site, designed to smooth your underwater photography sessions from start to finish.
With direct access to Soma Bay’s premier dive sites, you’ll spend less time traveling and more time in the water crafting frames that tell your story.
- On-site diving center staffed by qualified instructors and dive guides, experienced in photography-focused sessions.
- Convenient transport to nearby boat departures and shore entries, minimizing gear logistics between dives.
- Camera-ready facilities including rinse stations, gear storage, and secure lockers to protect equipment between dives.
- Photographer friendly guides who can tailor dives around lighting windows and subject availability for optimal shots.
- Flexible scheduling to align with early morning and late afternoon light, ideal for color and contrast in images.
For divers who shoot, this center combines expert guidance with streamlined access, making it easier to capture the vibrant life of Soma Bay’s reefs and wrecks in crisp, cinematic detail.
Jaz Soma Beach
Jaz Soma Beach is a dedicated snorkeling and photography friendly access point within Soma Bay’s reef vicinity. The site is renowned for clear water, calm conditions, and easy access to vibrant coral flats just beneath the surface.
What to expect for photography and snorkeling:
- Shallow, sheltered channels ideal for macro work and close up reef subjects.
- Crystal clear visibility that enhances color and detail in both wide and macro shots.
- Accessible coral flats with abundant small reef inhabitants for intimate underwater portraits.
Photography tips for Jaz Soma Beach:
- Use a macro lens for tiny critters and a wide angle for environmental reef scenes.
- Shoot in soft morning light to minimize surface glare and bring out natural colors.
- Maintain buoyancy to avoid contact with corals and to keep water clear of sediment.
Designed for easy entry and short boat trips, Jaz Soma Beach provides reliable conditions for both snorkeling adventures and beginner to intermediate underwater photography sessions.
Scuba World Divers
Based in Soma Bay, Scuba World Divers offers diving and snorkeling experiences for all levels. From shore outings to boat trips, their team focuses on safety, efficiency, and flexibility.
What to expect:
- Well organized trips with clear schedules and smooth gear handling
- Responsive staff who assist with equipment, briefings, and on-water support
- Helpful guidance for photography, snorkeling runs, and coral encounters
- Access to the bay’s top sites, with consistent service across sessions
Guest feedback highlights trips that run smoothly and staff who respond quickly, making experiences enjoyable for families, beginners, and seasoned divers alike.
References
- www.padi.com › diving in › egypt › safaga soma bay
- www.scubaworlddivers.com › soma bay
- divernet.com › world dives › soma safaga