
Daily Diving
Diving in Soma Bay: Top 3 Dives
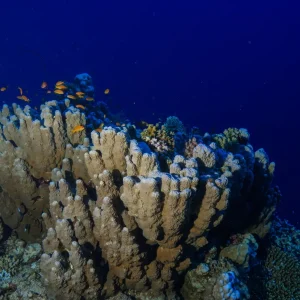
Diving in Soma Bay is an exceptional diving experience! Soma Bay is known for its crystal-clear waters and stunning underwater topography. For
Safaga and Soma Bay are standout Red Sea dive destinations that rank just behind Hurghada and Sharm el-Sheikh in popularity. Both areas offer a compelling mix of underwater experiences that attract divers of all levels.
Expect a tapestry of underwater scenery, from shallow reefs and thriving coral gardens to dramatic steep walls. The region also features several notable wrecks that add intrigue for wreck enthusiasts and curious explorers alike.
These sites sit close to Hurghada, making access straightforward for travelers. Most visitors reach the area via Hurghada International Airport, then transfer by road to Safaga or Soma Bay. Once on the ground, dive centers provide transfers to the boats and beaches, simplifying logistics for a smooth diving holiday.
Whether you are here for a quick weekend getaway or an extended Red Sea itinerary, Safaga and Soma Bay deliver reliable conditions, diverse marine life, and easy access from major hubs in Egypt.
Safaga is a former commercial harbor turned premier dive destination on the Red Sea coast. Its history adds a rugged charm to a modern diving scene designed for all levels.
Divers will find shallow and sheltered dives that are perfect for beginners, as well as dramatic reef-wall drop-offs for more testing explorations. Wreck lovers can also chart routes among sunken crafts that tell stories of the area’s maritime past.
The underwater world around Safaga is vibrant and varied. Expect bustling reef gardens sprinkled with color, plus chances to encounter pelagic life patrolling the drop-offs and open pelagic species cruising along the reefs.
Accessible from Hurghada and other Red Sea hubs, Safaga offers reliable conditions, easy logistics, and a diverse range of dive opportunities for both quick trips and extended itineraries.
Soma Bay sits on a long sandy peninsula at the northern edge of Safaga Bay, a luxury Red Sea resort enclave.
Its sheltered approach makes diving calm and approachable for all levels, with easy boat and shore access from the resort beaches.
The area blends leisure and adventure with impressive amenities:
Shore and boat diving here is excellent and well suited for families and non diving partners who want to stay close to the action. Expect sheltered coves, clear visibility, and abundant marine life just offshore.
Access is straightforward from Hurghada and other Red Sea hubs, with resort-based transfers making trips seamless.
Hurghada International Airport (HRG) is the primary gateway for visitors heading to Safaga and Soma Bay. Most travelers fly into HRG and enjoy a straightforward onward journey to the Red Sea resorts.
The drive from HRG to Safaga or Soma Bay typically takes about 45 minutes, depending on traffic and final destination. The route is well signed and commonly serviced by tour operators and local drivers alike.
Once you land, you have several dependable options to complete your transfer:
Practical tips to smooth the journey:
With these simple steps, your transition from HRG to Safaga or Soma Bay can be quick, comfortable, and ready for a great Red Sea diving start.
| Option | Typical Cost (approx.) | Pros | Cons |
|---|---|---|---|
| Resort transfers | Varies by property | Direct to hotel, hassle free | Can be slower if multiple stops |
| Taxis | Moderate to high, negotiable | Flexible timing, direct to door | Possible overcharging if not negotiated |
| Local buses / shared shuttles | Low | Most economical, social option | Less luggage space, fixed routes, longer travel time |
Whether you’re here for a short break or an extended dive itinerary, HRG serves as a reliable starting point to reach Safaga and Soma Bay with minimal fuss.
Makadi Bay sits to the north of Safaga and is often included in extended Red Sea itineraries for divers seeking a mix of macro life, reefs, and easy access.
Safaga and Soma Bay offer sheltered sites and wrecks, while Makadi Bay adds adjacent reef opportunities that diversify multi-day dives along the Red Sea coast.
Key contextual notes:
For planning, consider pairing Makadi Bay with Safaga and Soma Bay by allocating multi-day blocks and accounting for travel times in the dive schedule.
The Salem Express wreck lies off the coast near Safaga and stands as a poignant chapter in Red Sea diving history. The passenger ferry capsized in 1991 after a night crossing, resulting in a tragic loss of hundreds of lives. Today, the hull rests as a somber underwater memorial and a challenging dive for experienced wreck enthusiasts.
What makes the Salem Express compelling for divers:
Safety note – wreck penetration requires advanced training, careful buoyancy control, and adherence to local regulations. The site is delicate and currents can shift quickly, so follow a certified wreck dive plan and avoid disturbing artifacts.
Al Kafhain car ferry wreck sits nearby and adds another layer to Safaga’s underwater archive. This ferry capsized in 2005 and lies in relatively accessible depths for advanced divers who want to compare two distinct wreck experiences in the same coastal region.
Key aspects of the Al Kafhain wreck:
Both wrecks underscore why Safaga attracts seasoned divers who want to explore nautical history while honing technical wreck skills. Plan thoroughly, dive with a qualified guide, and respect the marine environment that guards these underwater memorials.
| Wreck | Year | Typical Depth | Divers’ Focus |
|---|---|---|---|
| Salem Express | 1991 | ~30–40 m (98–131 ft) on the wreck | Memorial, structure, photo opportunities |
| Al Kafhain | 2005 | ~20–35 m (66–115 ft) depending on site variation | Hull exploration, comparative wreck study |
These sites are best approached with current conditions in mind and with respect for the remains. They remain among the region’s most respected wreck dives for those with the technical training and experience to explore safely.
Diving in Safaga and Soma Bay is comfortable year round. Warm winters and hot summers create a consistent window for most divers, with adjustments needed as water changes through the seasons.
| Season | Typical water temperature | Recommended exposure gear |
|---|---|---|
| Summer (Jun–Aug) | ~28–30°C (82–86°F) | 5–3 mm wetsuit or shorty; skin protection; plenty of hydration |
| Spring (Mar–May) and Autumn (Sep–Nov) | ~25–28°C (77–82°F) | 3–5 mm wetsuit; optional hood in cooler mornings |
| Winter (Dec–Feb) | ~20–23°C (68–73°F) | 5 mm wetsuit at minimum; 7 mm or step up to 5/4 mm in cooler conditions |
Key takeaways for safety gear decisions:
Visibility tends to be consistently good around 22 meters (about 70 feet), which supports confident planning across the season. Pair appropriate protection with a buddy check and a cautious approach to deeper sites during cooler months.
In Safaga and Soma Bay, visibility is consistently good for planning and safety briefings. Divers can expect around 70 feet (22 meters) of visibility across most sites.
This stable visibility supports reliable dive planning, buoyancy checks, and clear buddy coordination, regardless of season or site depth.
Remember that local currents and surge can affect effective visibility near wrecks or steep walls. Always verify on site with your dive guide.
Marine life you might encounter in Safaga and Soma Bay offers unforgettable moments. Use these common sightings to shape safety briefings and set expectations for reef and wreck dives.
Safety reminders
By recognizing these species and adhering to smart buoyancy and distance practices, divers can enjoy the diverse life of Safaga and Soma Bay while protecting the underwater habitat for future visits.
Crocodilefish are a regular sight in Safaga and Soma Bay, tucked among vibrant reef gardens and along reef walls. These camouflaged ambush predators blend with sandy patches and coral crests, making patient scanning essential.
By keeping eyes open and buoyancy steady, you increase the chance of a close, respectful encounter with these distinctive fish while safeguarding their home.
Blue-Spotted Rays are a frequent sight in protected reef areas around Safaga and Soma Bay. These graceful benthic swimmers glide along sandy patches and reef edges during drift and wall dives.
Key safety notes:
Respect their space and they will often drift closer without crowding. Always follow your guide’s instructions when currents are present during drift dives.
Trumpetfish are a common reef dweller around Safaga and Soma Bay. They glide along the reef edges with their elongated bodies and needle-like snouts, often weaving through corals and kelp-like formations.
Situational awareness is crucial for avoiding contact or entanglement, especially near kelp-like structures and channel pockets where movement is restricted.
Respect their habitat and you’ll increase the chances of a close, safe encounter with trumpetfish while protecting the delicate reef environment for others to enjoy.
Napoleon fish patrol the reef zones around Safaga and Soma Bay, adding color and presence to predator-rich flats.
By admiring Napoleon fish from a comfortable distance, divers protect their natural behavior and keep the reef healthy for future explorations.
Clownfish are among the most visible residents of anemone habitats around Safaga and Soma Bay. Their bright color and distinctive movement make them a highlight for many divers, often darting in and out of protective anemone homes.
Observing tips to protect the habitat:
Buoyancy reminders for clownfish sites:
By observing clownfish calmly and keeping precise buoyancy control, divers help preserve their delicate homes while still enjoying close, respectful encounters.
Humphead Wrasse are a standout sight in Safaga and Soma Bay, known for their size and striking profile.
When you spot one, acknowledge its presence and give it space. These large reef residents are curious but can be stressed by crowds or sudden movements.
With patient, non-intrusive observation you can witness the wrasse’s sweeping motions and social interactions without impacting their behavior or habitat.
Turtle sightings are rare but memorable in Safaga and Soma Bay. When you spot one, stay calm and move slowly to minimize stress on wildlife.
Tips for turtle encounters:
Allow the turtle to continue on its way if it chooses. Observing from a respectful distance helps protect these gentle visitors and preserves their habitat for future dives.
Hammerhead sightings can occur at select Safaga and Soma Bay sites, offering a memorable predator encounter for experienced divers.
Where they appear in the Red Sea, they tend to roam deeper channels and reef drop-offs. Always dive with your guide and follow the planned profile to stay safe and protect the creatures.
Safety and etiquette reminders:
If a hammerhead appears, observe calmly, let it determine the interaction, and return to the planned dive profile once the moment passes. Your careful conduct helps protect these rare visitors for future dives in Safaga and Soma Bay.
Barracuda patrol the Red Sea reefs and wreck zones around Safaga and Soma Bay with quick, schooling flanks. They are common on reef edges and around sunken structures where current lines funnel prey along the habitat.
What to expect:
Safety and awareness tips to keep in mind:
By practicing calm, predictable movements and respecting distance, you can appreciate barracudas as active predators that contribute to the vibrant underwater tapestry of Safaga and Soma Bay without impacting their behavior or your safety.
Tuna and Mackerel are common pelagic species around Safaga and Soma Bay, often patrolling wrecks and open-water zones. Their rapid, streamlined schooling can create memorable moments for divers, especially near sunken structures and drop-offs.
What to expect:
Safety and etiquette tips:
By preserving distance and calm, you can enjoy the spectacle of tuna and mackerel while protecting both yourself and these dynamic underwater performers.
Stonefish, Mothfish, and Lionfish are venomous residents you may encounter among corals and rocky crevices around Safaga and Soma Bay. They blend into the reef structure, so vigilance is essential.
Key safety notes for venomous species:
If you are stung, follow your guide’s emergency plan immediately. Most stings require careful decontamination, pain management, and a prompt ascent to safety, with medical attention as soon as possible.
By staying aware of where these venomous creatures hide and practicing reef-specific safety habits, you reduce risk while still enjoying the intricate beauty of Safaga and Soma Bay’s underwater habitats.
Reef sharks are present at some Safaga and Soma Bay sites. When you encounter one, stay calm and observe from a respectful distance.
Following these guidelines helps protect both divers and sharks, supporting safe, responsible encounters in Safaga and Soma Bay.
Diving Conditions: Temperature, Visibility, and Gear in Safaga and Soma Bay require smart planning. Safety first means choosing the right protection, knowing what to expect, and packing gear that keeps you warm, buoyant, and confident underwater.
Diving conditions in Safaga and Soma Bay require smart planning.
Safety first means choosing the right protection, knowing what to expect, and packing gear that keeps you warm, buoyant, and confident underwater.
Water in this region stays warm most of the year, but temperatures vary enough to affect comfort and safety. Choose protection that matches the season and dive depth.
Safety tip: always test your comfort level before descending. If you start to feel cold mid-dive, ascend with a safe plan and adjust the next dive profile accordingly.
Visibility in Safaga and Soma Bay is usually good and matters for planning and safety. Expect clear conditions, but monitor day-to-day variations that can affect planning.
Safety tip: check visibility with your guide before descent. If visibility is reduced, slow your ascent profile and stay closer to your buddy and the guide’s signals.
Currents and surge can influence both warmth and visibility. Shore and boat dives may vary from calm to moderate drift, depending on site and tide.
Safety tip: keep a close eye on current strength and your air, especially during long or deeper dives. If your group slows or loses contact, execute a controlled regroup and recheck surroundings.
Use gear that supports buoyancy control, warmth, visibility, and safe navigation in Safaga and Soma Bay.
Buoyancy and comfort tips:
With the right protection, awareness of weather and water conditions, and careful gear choices, you can maximize safety and comfort on every Safaga and Soma Bay dive.
With proper protection and attentive planning, Safaga and Soma Bay dives stay safer and more comfortable overall.
Water Temperature Extremes in Diving Safaga & Soma Bay define how you layer up and plan your dives. Knowing the hot peak and the cool dip helps you stay comfortable, safe, and ready to dive every day.
August — warmest period
February — coolest period
Practical takeaway for Diving Safaga & Soma Bay: temperature dictates neap or drift dive readiness, comfort, and safety margins. Always check day of conditions with your guide, adjust exposure protection to fit the site, and prioritize gradual acclimation when transitions are rapid between day parts.
Expect visibility near the safer baseline of 22 meters. This common benchmark supports reliable planning, buddy coordination, and safe navigation across Safaga and Soma Bay sites.
Variations can occur day to day. If visibility narrows, slow your pace, reduce maximum depth, and stay within your planned safety margins.
Wetsuit Recommendations tailored for Diving Safaga & Soma Bay. We gear you for comfort, safety, and long, enjoyable dives in every season.
Our practical guide translates water temperatures into ready-to-use protection. Choose your suit based on season, dive depth, and personal cold tolerance.
Layering tips:
Gear notes:
At Extra Fun Diving, we help you tailor wetsuit choices to your itinerary. We prioritize comfort, buoyancy, and protection so you can focus on the beauty of Diving Safaga & Soma Bay.
Get fresh exclusive updates and scuba diving offers direct into your inbox (No spam we promise!)
Diving in Soma Bay is an exceptional diving experience! Soma Bay is known for its crystal-clear waters and stunning underwater topography. For
Scuba Diving in Hurghada Are you ready to embark on an underwater adventure like no other? Hurghada, Red Sea, Egypt
top 10 Red Sea dive sites Red Sea dive sites are one of the most enchanting diving destinations in the