
Daily Diving
Diving in Soma Bay: Top 3 Dives
Diving in Soma Bay is an exceptional diving experience! Soma Bay is known for its crystal-clear waters and stunning underwater topography. For
Diving Safaga & Soma Bay presents two renowned reefs that anchor many Red Sea itineraries. Panorama Reef stands out as a marquee stop in Soma Bay, while Middle Reef delivers an exhilarating drift and surprising underwater architecture that keeps divers coming back.
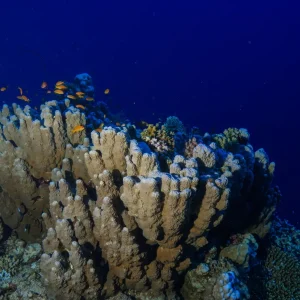
Panorama is one of the area’s most famous reefs. It sits within a longer reef system and is often visited by liveaboards heading to Soma Bay. The site is roughly 1 kilometer long and rewards divers with a mix of lush coral, clear walls, and frequent action on the drift.
Tips for Panorama:
Middle Reef is a wild drift dive that many divers pair with Panorama for a day of Safaga & Soma Bay exploration. The drift runs along a dramatic wall and continues into a shallow, vibrant garden.
What makes Middle Reef special:
| Feature | Experience |
|---|---|
| Drift type | North to southeast drift along a dramatic wall |
| Key depths | Main wall around 27 m; garden at 12 m; cave at 6 m |
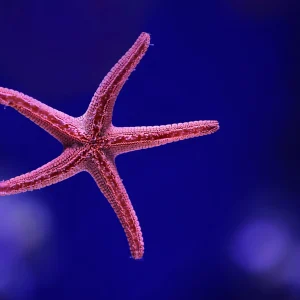
| Notable sights | Vibrant coral gardens, potential for reef fish schooling, occasional large pelagics |
| Unusual features | Accessible cave with light filtering in from above |
Overall, Panorama Reef and Middle Reef offer a complementary pair of experiences for divers exploring Safaga & Soma Bay. Panorama provides iconic exposure to big reef life and a long, scenic grid of corals, while Middle Reef delivers a heart pounding drift with a tucked away cave that rewards attentive divers with a sense of underwater exploration.
Whether you are planning a classic Safaga & Soma Bay itinerary or a dedicated reef-focused day, these two dives set clear expectations: stellar visibility, abundant life, and memorable drift and cave encounters.
Panorama Reef is a marquee dive site that both liveaboards and day boats from Soma Bay regularly include on their itineraries. Its position near the southern end of the Safaga & Soma Bay complex makes it a hallmark drift among the area’s reefs.
The reef stretches for nearly 1 kilometer, offering a long canvas of corals, walls, and swim zones. This makes it ideal for a single drift dive that reveals changing textures and life as you move along the reef face.
How to plan your time on Panorama:
Panorama Reef delivers a balanced mix of big reef life, dramatic topography, and accessible drift dynamics. It rewards divers who blend macro focus with wide-angle scanning as you traverse its near 1 km length.
Middle Reef is a beautiful, thrilling drift dive that runs from north to southeast. Let the current guide you along a dramatic wall, keeping the reef on your right for a classic flow.
The drift experience starts on the northern side and unfolds as you ride toward the southeast. The wall drops away to around 27 m, revealing a tapestry of hard corals and vibrant marine life. If you time it right, the current carries you smoothly past pockets of life and pristine coral gardens.
For a highlight reel moment, ascend to 12 m near the reef and glide over the best coral garden in the area. This shallow leg is a chance to pull out a wide angle and savor the colors and textures in bright, filtered light.
The hidden cave sits on the southwest to west plateau at about 6 m depth. Enter one entrance and exit another as light filters in through gaps in the reef surface. It’s a small pocket of drama within an expansive habitat, offering a memorable contrast to the deeper wall and shallow garden.
As the dive winds down, the end-of-dive shallows unfold with overhangs and tunnels that invite careful navigation and playful exploration. The mix of wall, garden, cave, and shallow tunnel environments provides a varied underwater stage for photographers and curious divers alike.
Planning tips
Middle Reef delivers a balanced, cinematic experience for divers exploring Diving Safaga & Soma Bay, pairing dramatic wall scenery with intimate garden moments and a small cave that adds an extra layer of underwater mystery.
Safaga & Soma Bay Dive Logistics cover the practical side of reaching and moving around the Red Sea coastline. Plan ahead to minimize downtime and maximize time on the water.
Safaga and Soma Bay are accessible from several airports and are served by local operators. Reliable shore facilities and harbors support smooth gear prep and quick departures to dive sites. You’ll find a mix of quiet anchor points and busy service centers along the coast to suit different styles.
The most common entry point for divers visiting Safaga & Soma Bay is Hurghada International Airport (HRG).
From Hurghada you can connect quickly to the bay’s dive sites with a short transfer.
Once you land, secure reliable transport to your first dive site.
Arrange airport pickup, hotel shuttle, or a private transfer in advance to avoid delays.
| Category | Notes |
|---|---|
| Local currency | Egyptian pounds (EGP) are widely accepted. Euros and major currencies (GBP, USD) are often accepted at shops and dive centers. Carry some cash for tips and small purchases. |
| Tips | Bring plenty of change in coins or small notes. Tipping drivers, boat crew, and staff is customary and appreciated. |
| On‑site payments | Dive centers typically accept Egyptian pounds, Euros, GBP, and US dollars. Confirm accepted currencies before payment. |
| Transport essentials | Pre‑booked transfers reduce waiting times. If you rent a car, verify parking and insurance terms; many divers rely on organized boat transfers rather than self driving. |
Landing and local support make the transition smooth. With a clear plan for transfers and a practical currency approach, you can focus on the underwater wonders of Safaga and Soma Bay from day one.
Practical Diving Logistics: Local Centers, Boats, and Access
Safaga and Soma Bay are built around a strong, service oriented diving infrastructure. Shore dives from Soma Bay hotels like the Breakers complex are common, and the Breakers House Reef access is a regular anchor for both hotel guests and day visitors. This makes your first underwater moments quick and easy, with minimal travel time to the reef edge.
Boat dives are the other backbone of the region. Local operators run half day and full day programs, often combining sites such as Panorama Reef and Middle Reef into a single outing. Drift dives are a specialty here, with boats planning currents and positioning to maximize the experience while keeping safety in focus.
Drift planning is typically coordinated by the dive centers and boat crews. Expect staff to assess drift direction, current strength, and entry points on the day. They’ll tailor the plan to keep travel time efficient and to minimize fatigue while delivering a memorable reef encounter.
Booking a day with reliable crews is straightforward when you know the flow of operations. Most centers offer pre-booking through your hotel concierge or directly with the operator. On arrival, confirm the day’s pick up times, boat meeting point, and the gear you need. If you are combining shore and boat dives, confirm logistics so you can switch smoothly from jetty to deck.
What to expect on the ground:
To ensure a seamless experience, use a simple booking checklist:
With the right local centers, dependable boats, and clear access points, planning a day of Diving Safaga & Soma Bay becomes straightforward. The result is more underwater time and less logistics friction, whether you are chasing Panorama Reef, Middle Reef, or a memorable shore dive from Soma Bay.
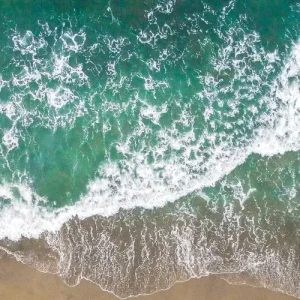
Water temperatures in Safaga and Soma Bay vary with the season. Pack layers that match the typical year-round range to stay comfortable on long dives and drift sessions.
Suit recommendations by season:
Practical tips:
Diving Safaga & Soma Bay demands gear discipline and strong situational awareness. Panorama Reef invites drift dynamics along a long reef face, while Middle Reef combines wall drift with a shallow, light filled cave.
Prepare your kit to stay comfortable, balanced, and reef friendly throughout both experiences.
Begin with a calm, methodical checks routine before entering the water. This prep helps you stay focused on safety and team coordination.
Review equipment with your buddy, then verify buoyancy and signaling gear. A quick, clear check now saves time and confusion later.
Drift conditions can shift with the tide. Expect changes in speed and line as you plan your swim along the reef features.
Stay aware of others in the drift corridor and keep a clear path to the main features. A steady, relaxed pace helps everyone stay together.
The 6 m cave sits on the southwest to west plateau and lets light filter in. Plan a deliberate entry and exit. Avoid overexertion in tight pockets.
In shallow zones between 6 and 12 m, be mindful of overhead environments. Do not penetrate beyond your training limits without appropriate cave diving credentials.
Watch for overhangs and tunnels that can trap bubbles or snag lines. Move calmly and route your path before entering.
The following table outlines gear needs for Panorama and Middle Reef, with reasons for each site.
The table lists what to bring and why it matters for both Panorama and Middle Reef.
| Equipment need | Why it matters for Panorama | Why it matters for Middle Reef |
|---|---|---|
| Buoyancy device and weights | Precise buoyancy aids clean drift lines and keeps you off the reef during fast sections. | Balanced buoyancy helps in close inspection of the shallow cave and prevents contact with delicate corals. |
| Reef-safe lights | Assist at dusk or dawn drift segments where visibility shifts. | Illuminate the cave entrance and the garden edges without blinding nearby divers. |
| HB buoy or DSMB | Useful for drift navigation and signaling if separated from the group in Panorama’s flow. | Useful for marking the cave exit or a planned surface interval point near Middle Reef. |
| Signaling devices | Whistle or slate for clear in-water comms in busy drift zones. | Clear plan for cave time and exit encourages safe completion of the shallow phase. |
| Cutting tool or line scissors | Unlikely required, but handy if a line or debris needs to be cleared from gear safely. | |
| Gloves | Minimal use to protect hands in filter feeds and around macro life without injuring corals. | Useful when navigating through small holes or around coral ledges in the cave vicinity. |
Plan your moves and check gear together. Clear signals help everyone stay aligned as you drift and surface.
These sites reward patient, considerate divers. Respect for the reef reduces damage and protects marine life for future visits. Maintain neutral buoyancy, avoid contact with macro organisms, and minimize fin kicks near coral heads.
Good buoyancy discipline and reef‑safe habits help preserve the experience for all divers while you explore.
Key takeaway for Panorama & Middle Reef dives: choose gear that supports smooth drift control and reef‑safe practices.
With disciplined gear checks, clear communications, and a reef‑aware mindset, you maximize safety and the beauty of these iconic Red Sea dives.
Extra Fun Diving is a 5 star PADI dive center based in Soma Bay, dedicated to making your Red Sea adventures smooth, safe, and unforgettable. The center runs daily diving trips, guided tours, and a full spectrum of scuba diving courses to suit all levels.
As a local operator with deep roots in the Soma Bay diving community, Extra Fun Diving offers efficient access to the area’s top sites. From the iconic Panorama Reef to the exhilarating Middle Reef and a multitude of shore and boat options, you’ll find flexible itineraries that fit your pace and interests.
Booking and logistics are streamlined when you dive with a local operator. Expect reliable transfers, familiar boats, and experienced guides who know the currents around Panorama Reef and Middle Reef. With staff who work across Soma Bay’s reef network, you’ll gain valuable insights into planning drift dives, maximizing underwater time, and spotting wildlife specific to this coast.
In the local community, Extra Fun Diving is known for professional service, clear safety practices, and a passion for protecting the ecosystem. Whether you’re returning to refine your skills or chasing new underwater memories, this Soma Bay base helps you focus on the sea while the planning happens behind the scenes.
Get fresh exclusive updates and scuba diving offers direct into your inbox (No spam we promise!)
Diving in Soma Bay is an exceptional diving experience! Soma Bay is known for its crystal-clear waters and stunning underwater topography. For
Scuba Diving in Hurghada Are you ready to embark on an underwater adventure like no other? Hurghada, Red Sea, Egypt
top 10 Red Sea dive sites Red Sea dive sites are one of the most enchanting diving destinations in the